Basic Strategy: A Chart Built for Your Table
Updated
 Basic strategy trainer
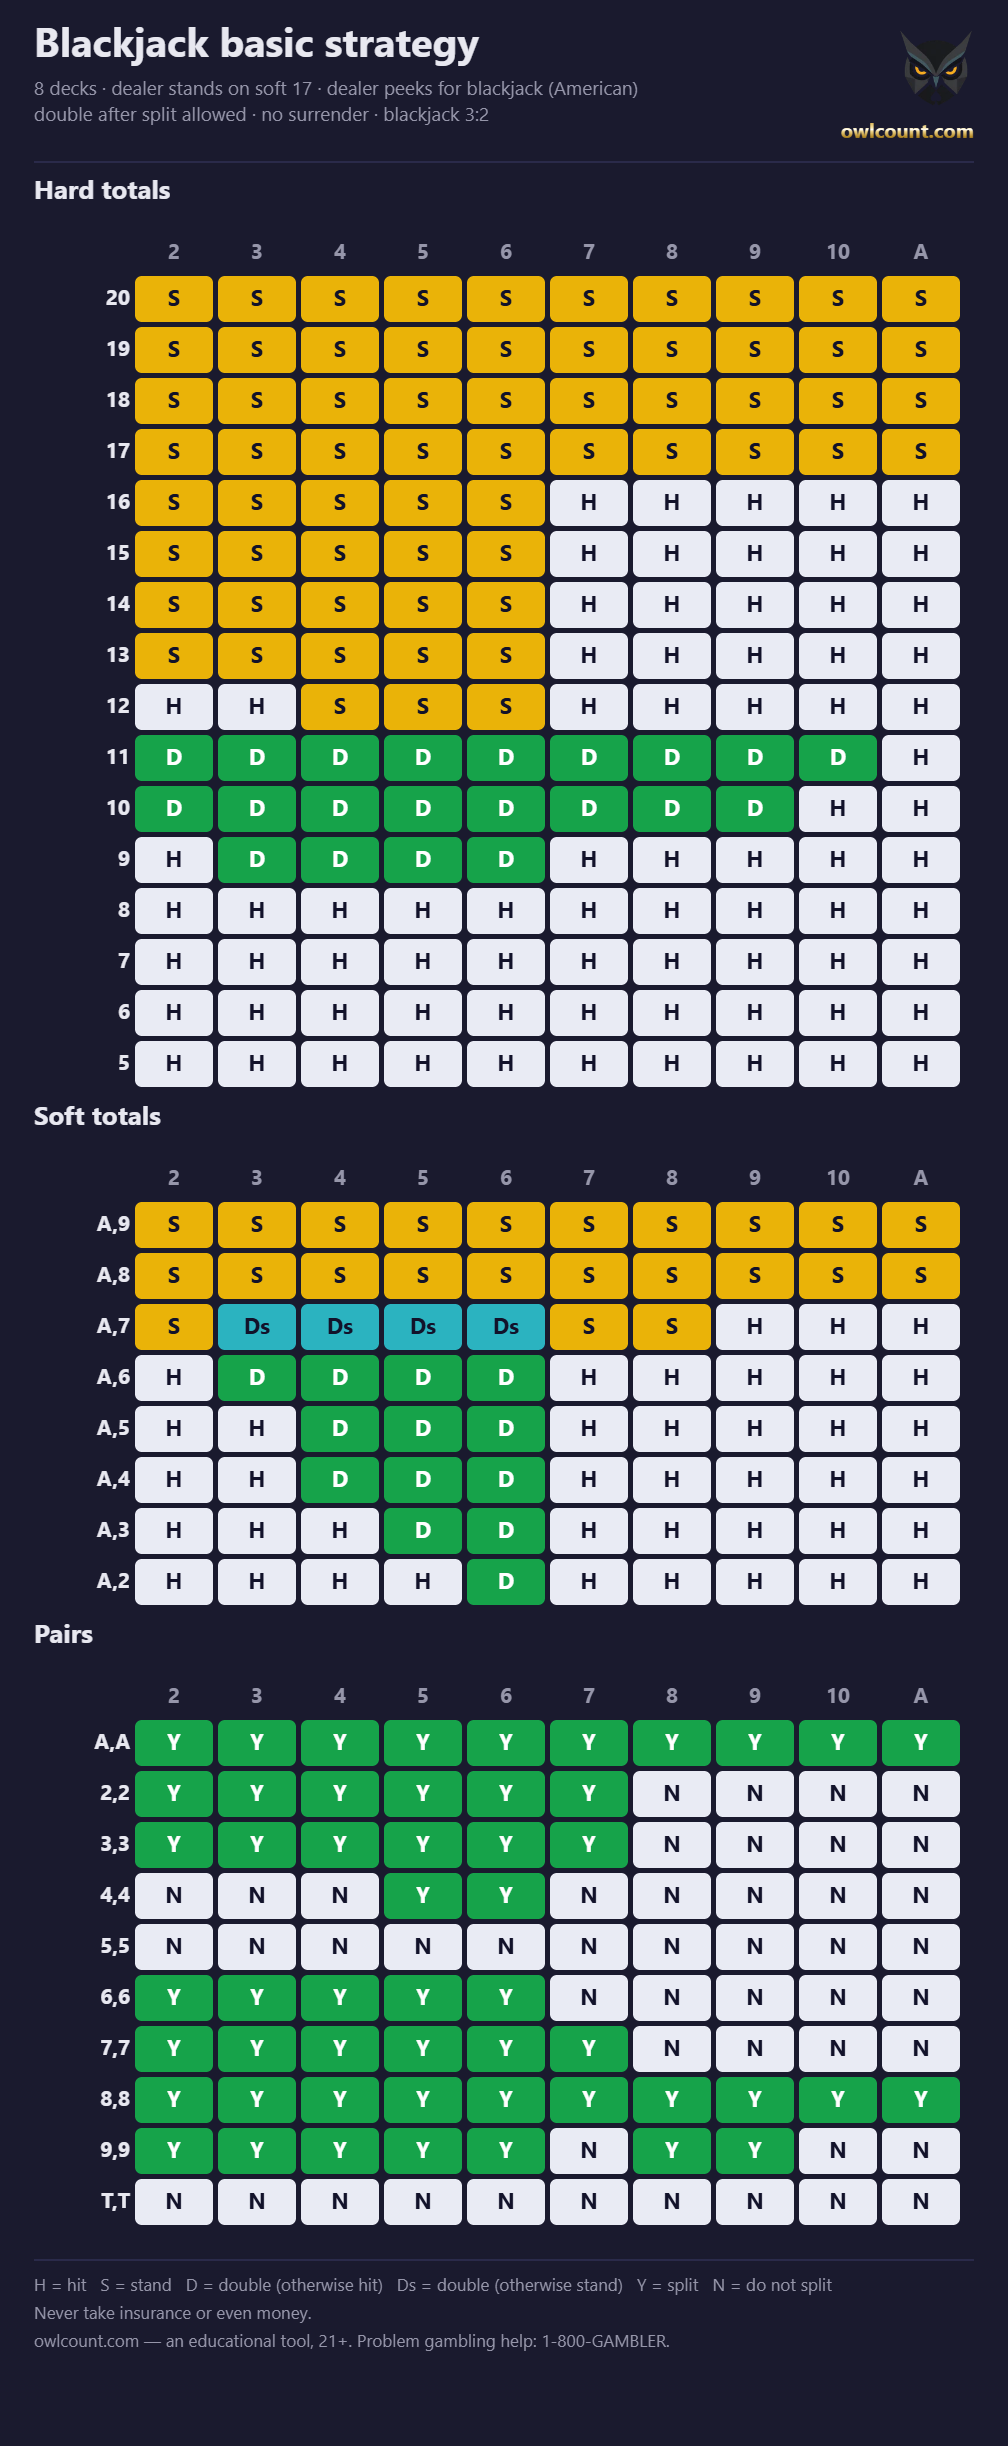
 Basic strategy is not one chart. There are 28 of them, and which one applies to you depends on your table: mainly whether the dealer takes a hole card and whether they hit a soft 17. Most charts you find online are for one specific rule set, and nothing tells you which.
- There is no single chart. Table rules move 26 cells out of 340.
- The other 92% never changes, so learning the base is always worth it.
- What moves it: the peek rule · S17 or H17 · DAS · surrender. Not the deck count.
- American standard: eight decks, S17, dealer peeks, DAS allowed, no surrender.
- Set your rules below and the chart, the download, and the trainer all follow.
Generate the chart for your table
Set the rules and the chart recalculates immediately. The trainer picks up the same rules, so it will never drill you on a variant you do not play.
The download gives you the chart currently on screen. Change the rules and the file changes with it.
Deck count is deliberately not here. Between six and eight decks the chart differs in a single cell, and the difference there is small enough that either play is fine. We compute for eight, the most common shoe. Details below.
The trainer picks up these settings too, and your browser remembers them.
| 2 | 3 | 4 | 5 | 6 | 7 | 8 | 9 | 10 | A | |
|---|---|---|---|---|---|---|---|---|---|---|
| 20 | S | S | S | S | S | S | S | S | S | S |
| 19 | S | S | S | S | S | S | S | S | S | S |
| 18 | S | S | S | S | S | S | S | S | S | S |
| 17 | S | S | S | S | S | S | S | S | S | S |
| 16 | S | S | S | S | S | H | H | H | H | H |
| 15 | S | S | S | S | S | H | H | H | H | H |
| 14 | S | S | S | S | S | H | H | H | H | H |
| 13 | S | S | S | S | S | H | H | H | H | H |
| 12 | H | H | S | S | S | H | H | H | H | H |
| 11 | D | D | D | D | D | D | D | D | D | H |
| 10 | D | D | D | D | D | D | D | D | H | H |
| 9 | H | D | D | D | D | H | H | H | H | H |
| 8 | H | H | H | H | H | H | H | H | H | H |
| 7 | H | H | H | H | H | H | H | H | H | H |
| 6 | H | H | H | H | H | H | H | H | H | H |
| 5 | H | H | H | H | H | H | H | H | H | H |
| 2 | 3 | 4 | 5 | 6 | 7 | 8 | 9 | 10 | A | |
|---|---|---|---|---|---|---|---|---|---|---|
| A,9 | S | S | S | S | S | S | S | S | S | S |
| A,8 | S | S | S | S | S | S | S | S | S | S |
| A,7 | S | Ds | Ds | Ds | Ds | S | S | H | H | H |
| A,6 | H | D | D | D | D | H | H | H | H | H |
| A,5 | H | H | D | D | D | H | H | H | H | H |
| A,4 | H | H | D | D | D | H | H | H | H | H |
| A,3 | H | H | H | D | D | H | H | H | H | H |
| A,2 | H | H | H | H | D | H | H | H | H | H |
| 2 | 3 | 4 | 5 | 6 | 7 | 8 | 9 | 10 | A | |
|---|---|---|---|---|---|---|---|---|---|---|
| A,A | Y | Y | Y | Y | Y | Y | Y | Y | Y | Y |
| 2,2 | Y | Y | Y | Y | Y | Y | N | N | N | N |
| 3,3 | Y | Y | Y | Y | Y | Y | N | N | N | N |
| 4,4 | N | N | N | Y | Y | N | N | N | N | N |
| 5,5 | N | N | N | N | N | N | N | N | N | N |
| 6,6 | Y | Y | Y | Y | Y | N | N | N | N | N |
| 7,7 | Y | Y | Y | Y | Y | Y | N | N | N | N |
| 8,8 | Y | Y | Y | Y | Y | Y | Y | Y | Y | Y |
| 9,9 | Y | Y | Y | Y | Y | N | Y | Y | N | N |
| T,T | N | N | N | N | N | N | N | N | N | N |
Currently showing: eight decks · dealer stands on soft 17 · dealer peeks for blackjack (American) · double after split allowed · no surrender. That is the most common rule set in the country. Switch to a no-hole-card game above if you are playing in Europe or online. Never take insurance.
How to read the chart
It is the intersection of two facts: the row is your hand, the column is the dealer's upcard. Where they cross is your play.
Why it works
Everything hangs on the dealer's upcard. The dealer plays by a fixed rule, drawing to 17, which means you can compute exactly how often each upcard busts. That single table is what the entire chart is built on.
Hence the shape of the strategy: when the dealer shows a weak card, 2 through 6, you play carefully and let them break, standing more often and doubling when you can. When they show a strong card, 7 or higher, you have to be aggressive, because the dealer is likely to make a real hand.
Exact dealer bust probabilities
| Dealer shows | Chance of busting |
|---|---|
| 6 | 42% |
| 5 | 42% |
| 4 | 40% |
| 3 | 37% |
| 2 | 35% |
| 7 | 26% |
| 8 | 24% |
| 9 | 23% |
| 10 | 23% |
| Ace | 17% |
Six decks, dealer stands on soft 17, computed after the dealer has checked for blackjack. That last part matters: conditioned on the hand continuing, a ten busts 23% of the time and an ace 17%. The full distribution of dealer totals is in dealer rules.
What to expect over many hands
Even played perfectly, blackjack is a close game. Over the long run it comes out roughly like this:
You lose slightly more hands than you win, but your wins pay more on average: a blackjack returns 3:2, and you double and split precisely when you are ahead. That closes almost the whole gap, leaving the house with about half a percent. The dealer's average finishing hand is around 18 when they do not bust, which is why the rule of thumb is that you generally need 18 or better to win. Lower hands win mostly because the dealer breaks, which happens on about 29% of hands overall.
Why there is no single basic strategy chart
Because the best play depends on how the dealer plays and on what the table lets you do. Change one rule and part of the chart shifts. We computed all 80 combinations of the common rules and they collapse into 28 genuinely different charts. Of the 340 cells, only 26 ever move. The rest are the same everywhere.
That is good news as well: learning the base is worthwhile even if you do not know what table you will end up at. But those 26 cells include hands that come up constantly, such as hard 11 and a pair of eights.
What each rule changes
| Rule | Cells moved | Where |
|---|---|---|
| No double after split | 7 | pairs 2,2 · 3,3 · 4,4 · 6,6 |
| Dealer does not peek (ENHC) | 4 | hard 11 · pairs A,A and 8,8 |
| Dealer hits soft 17 (H17) | 4 | hard 11 · soft A,2, A,7, A,8 |
| Surrender offered | 4 | hard 15 and 16 |
| Six decks instead of eight | 1 | soft A,2 against a 5, and it is a coin flip |
Every count here is computed from our own charts, not estimated. The method is in how we calculate.
What changes when the dealer does not peek?
This one difference is what separates European blackjack from American. The full comparison, including what it does to the house edge, is in European versus American blackjack.
At an American table the dealer with a ten or an ace checks the hole card immediately. If it is a blackjack the round ends and you lose your original bet only.
At a no-hole-card table that check does not happen until you have finished playing. The dealer may well be holding the card the whole time, simply unexamined. When it finally turns over as a blackjack, you also lose the money you added by doubling or splitting. That makes committing extra chips against a ten or an ace more expensive, and four cells move because of it.
| Hand | Dealer | American | No hole card |
|---|---|---|---|
| hard 11 | 10 | double | hit |
| pair 8,8 | 10 | split | hit |
| pair 8,8 | A | split | hit |
| pair A,A | A | split | hit |
Hit and stand never move, and that is derivable rather than merely asserted. A dealer blackjack takes your whole wager, and that wager is the same size whether you hit or stand. Both options shift by the same amount, so their order is unchanged. Only the plays that add money are affected, which is exactly why all four cells are doubles and splits.
So when you read that aces and eights are always split, that is true at an American table. It is not true at a no-hole-card game, which is what you will meet in London, Melbourne, and on plenty of live dealer tables online.
What changes with S17 and H17?
A dealer who hits soft 17 is more dangerous, and the game moves against you by about 0.21%. Four cells change, and three of them are soft hands:
- A,8 against a 6: stand under S17, double under H17.
- A,7 against a 2: stand under S17, double under H17. Borderline, and the difference is tiny.
- A,2 against a 5: hit under S17, double under H17. Also borderline.
- Hard 11 against an ace: hit under S17, double under H17.
If a chart tells you to double soft 19 against a six, you are looking at an H17 chart. H17 is the common American shoe rule — downtown Las Vegas and most six-deck Strip games hit — while double-deck and higher-limit tables often stand, and S17 is the more usual rule in Europe. Check the placard, and see dealer rules for the rest.
What changes with double after split?
DAS means you may double a hand created by splitting a pair. It is an unobtrusive rule with the largest effect on the chart of any of them, moving seven cells. With DAS you split more often: twos and threes against a 2 and a 3, fours against 5 and 6, and sixes against a 2.
The reasoning holds together neatly. Splitting is a bet that you can turn one bad hand into two good ones, and if you may also add money to those hands, it pays in spots where it otherwise would not. Without DAS the game is worse for you by about 0.12%.
What does the deck count change?
Almost nothing, which is why deck count is not in the settings above. Between six and eight decks a single cell differs, soft A,2 against a 5, and the expected value gap there is under 0.0002, meaning it is a coin flip. Between six and four decks, nothing differs at all.
Real differences only appear in single and double deck games: four cells at two decks and fourteen at one, compared with eight.
| Decks | Cells different | Note |
|---|---|---|
| 6 | 1 | a coin flip, play it either way |
| 4 | 1 | the same one |
| 2 | 4 | worth learning if you play double deck |
| 1 | 14 | a genuinely different chart |
So deck count is worth caring about for card counting, where it matters a great deal, but barely for the chart. One warning: single-deck games in the US very often pay 6:5, which costs you far more than fewer decks gains.
What does the wrong chart cost?
Less than people fear, and it is still worth fixing because the fix is free. You are looking at a different picture, and that is the whole cost.
Playing a chart built for the wrong rule set moves a handful of cells, and those cells are rare hands. The error lands in the range of a few hundredths of a percent, which on $10,000 of action is a few dollars.
Set that next to the things that actually hurt. A 6:5 payout costs 1.36%, roughly twenty times more, and standing on every hard 12 through 16 costs 3.56%. Choosing the wrong table, or flinching at the wrong hands, is far more expensive than using a slightly wrong chart. The full price list is in which mistakes cost the most.
How do I find out my table's rules?
In a casino, the rules are printed on the placard beside the shoe and on the layout itself. Online, they are behind the information icon in the game window. Look for the deck count, “dealer stands on all 17s,” and the blackjack payout.
If it is not written down, the game itself tells you:
- Does the dealer peek? Watch whether a dealer showing a ten or an ace checks the hole card before you act, and whether a blackjack ends the round immediately. That is the American game. If no check happens and play continues, it is no hole card. Do not go by whether the card is dealt at all, because most no-hole-card tables deal it anyway and simply leave it alone. The check is what matters, not the deal.
- S17 or H17? Watch what happens on an ace and a six. If the dealer stands, it is S17.
- Decks: usually six or eight in a shoe game, one or two handheld. It is on the placard.
- DAS: try to double after a split. Either it is allowed or it is not.
- Surrender: rarely advertised. Ask the dealer, who will tell you.
How to learn the chart
Anyone can read a chart. The problem is recalling the right play in two seconds at a live table with a dealer waiting on you. There is one cure, and it is repetition.
The trainer deals random hands and grades them against the rules you set above, so it will not teach you an American variant while you are playing a European game. It has a Tricky Hands mode that deals only the hands people get wrong most often.
Once the chart is second nature, the next step is learning to count cards. Counting without solid basic strategy is pointless, because mistakes on ordinary hands cost more than the count earns.
The plays people get wrong most
A few situations account for most of the money lost to bad basic strategy:
- 16 against a 10. You hit, or surrender if the table allows it. You never stand.
- Soft 18 (A,7) against a 9, 10, or ace. You hit. Against a 9 or higher, 18 is not enough.
- Aces and eights. Split them even against a strong upcard. The exception is a no-hole-card game against a ten or an ace.
- Hard 11. Double it, do not just hit. Against an ace it depends on the soft 17 rule.
- A pair of tens. Never split. Twenty is an excellent hand and two hands are not better than one good one.
How to memorize it
Do not treat it as 340 cells. Learn it in blocks: hard totals first, meaning when to stand and when to hit against a weak upcard versus a strong one. Then the doubles, mainly 9, 10, and 11. Then the soft hands. Pairs last.
One rule of thumb carries most of it: against a weak dealer card, 2 through 6, play carefully. Against a strong one, 7 and up, be aggressive. Drill the decisions until you know them without thinking, and only then add card counting.
• Basic strategy holds the house edge to roughly 0.46% on a good six-deck game.
• Row is your hand, column is the dealer's upcard.
• Careful against 2 through 6, aggressive against 7 through ace.
• Split aces and eights, never split tens.
• Never take insurance without a count.
Once the chart is automatic, the next level is the live counter, which tracks the count and your edge, and in progressive mode shows the deviations from this chart that turn the advantage in your favor.
Where do these numbers come from?
They are not copied. Every cell of every chart is computed from the expected value of all the ways a round can play out, for that shoe composition and those rules, which is the same method that produced basic strategy in the first place.
The calculation is checked twice. It must exactly reproduce the published chart for eight decks with S17, DAS, and surrender, and it must land on the known house edge figures for different rule sets. The differences between rule sets come out right: H17 +0.213%, no DAS +0.120%, surrender −0.071%, no hole card +0.110%, and a 6:5 payout +1.360%.
The whole procedure and its verification, including where our model reaches its limits and what we got wrong in the past, is on how we calculate the numbers on this site.
The chart gives one letter per cell. If you want to know why a particular cell says what it says, and what the wrong letter costs, we have written up the twelve hands people ask about most — including the one this site had wrong.
Once you know which chart is the right one for your table, the next problem is having it with you. You can print one that matches the rules you are playing.
Keep reading
By Martin Kosek · every number on this site is computed by us, not copied.
← Back to the live counter